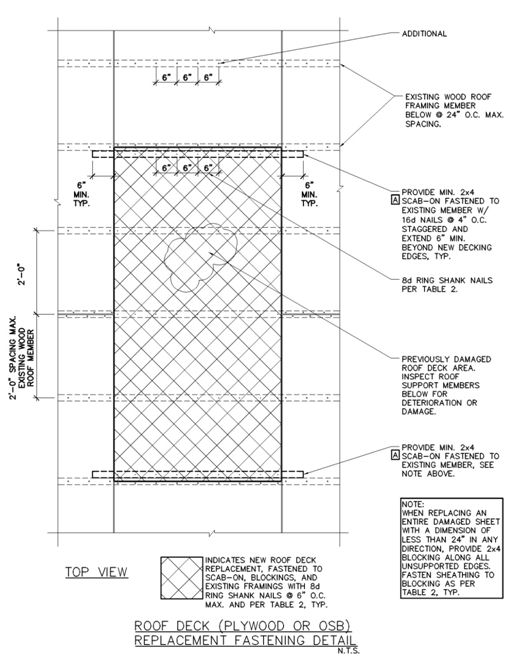
Tile Roof Underlayment Nailing Pattern

The Standard Nailing For Asphalt Shingles Is A Four Nail Pattern With Nails Placed 1 Inch From Each End Of Each Shingl Shingling Diy Roofing Roof Installation

Roof Underlayment Requirements Recommendations Is Roofing Felt Roofing Underlayment

Details That Matter On Asphalt Shingle Roofs Roof Installation Roof Shingles Fibreglass Roof

Tile Roof Rooftopgarden Rooftop Garden Drawing Drawing Drawing 2020

Pin On Roofing Tech Diy

Pin On Deck

How to install felt underlayment for a new roof.
Tile roof underlayment nailing pattern. Some roofers use regular roofing nails some use staples some attach it with hardly any nails at all using only a single nail every few feet. Corrosion resistant nails must be minimum 11 gauge with 5 16 inch heads and long enough to penetrate the sheathing by 3 4 inch typically 8d nails. Cut drip edge flashing at an angle at the corner press it lightly against the eave end not too hard or you will misshape it and drive a nail near the end. Nails are the least expensive and most common method for attaching concrete and clay tiles.
That s why we saved the best roof underlayment for tile roofs for last. If you so happen to have thicker underlayment 3 4 inch or more then use 4d ring shank nails. When nailing underlayment don t think that. For example inch underlayment calls for 3d ring shank nails every 3 inches along the edge and every 6 inches within the field of the underlayment.
Tile roofs are very common among users. Apply drip edge to the eave. Install the underlayment for the new roof tile next working with 10 foot sections at a time. Pick up packs of 3d ring shank nails.
It starts with installing solid decking usually plywood or oriented. Nailing the underlayment there has always been a lot of controversy in the construction industry on how to properly nail the underlayment or whether it s even necessary. To place the tiles nail them. Not only because they look good but they re also fairly priced nowadays.
Secure the underlayment with nails that are at least 2 inches from the edge of the roof. Use a chalkline or align it by eye to make sure it is straight then drive roofing nails every foot or so to fasten it to the sheathing. Installing a roof is much more than just nailing shingles onto some boards. A roofing underlayment usually has all the basic features you d want in 2020.
Tiles can be nailed either directly into the roof sheathing or tiles with lugs can be nailed to battens.

Roof Repair Basics How Your House Works Home Repairs Home Repair Roof Repair

Common Roofing Errors Jlc Online Roofing Roof Underlayment Roofing Roof Repair Roof Architecture

Open Valley Technique In Asphalt Roofing Mastering Roof Inspections Asphalt Composition Shingles Part 23 Int Roof Inspection Composition Shingles Shingling

What Wood Would Woo Where Types Of Wood Flooring Wood Floors Flooring

Installation Of A Typical Layboard Detail With The Dryseal Flat Roofing System On A Warm Roof Constructi Roof Framing Porch Roof Construction Roof Construction

Pin On Roofing

Ggvtl Rcxldiem

Read This Before You Redo A Bath Bathroom Redo Remodel Tile Floor

Pin On Exterior Design

Hardie Plank Install Instructions Figure 1 20 Fiber Cement Siding Standard Nailing Pattern C Wiley Cement Siding Fiber Cement Siding Siding

How To Roof A House Roofing Roof Repair Home Maintenance

Pin On Home Repair
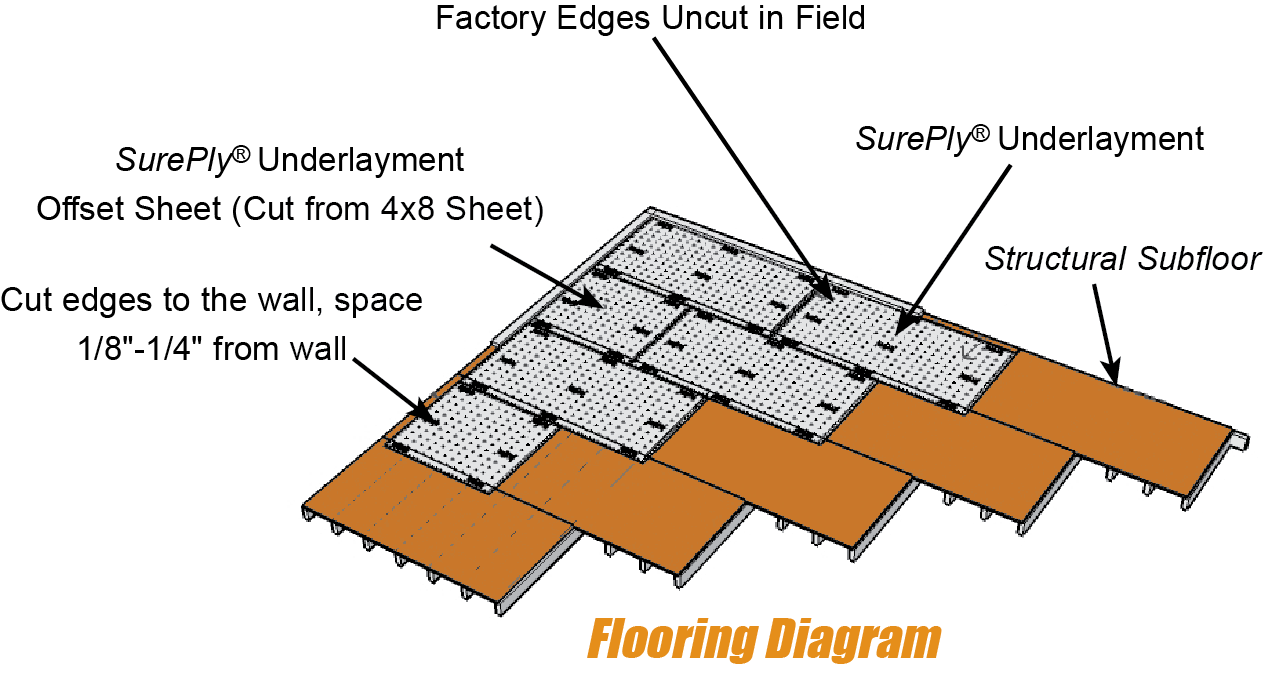
Sureply Plywood Underlayment Installation Instructions

Pin On Home Renovations

Article Image Roof Insulation Roof Sheathing Foam Insulation

Beginner S Guide To Laying Tile A Beautiful Mess How To Lay Tile Laying Tile Floor Flooring

Reclaimed Cement Tile Exquisite Surfaces Style Tile Flooring Roof Styles

Gator Skin 42 In X 285 8 Ft Synthetic Roof Underlayment Fgsy100 Underlayment Roofing Roof
Https Encrypted Tbn0 Gstatic Com Images Q Tbn 3aand9gcqoszqubu8rh1lwdrnank9uvs G1geedu Uf24nib Z Waf0 13 Usqp Cau

Shingles Near Top Of Roof Asphalt Roof Shingles Roof Repair Diy Roof Shingles

Save Up To 80 On New Roofing Material Only Roofing Discount Centers Contact 8006902134 Call Us To K Roofing Materials Roofing Types Of Roofing Materials

Common Roofing Errors Jlc Online Roofing Roof Underlayment Roofingtipstricks Roofing Roof Repair Cool Roof


Exterior Over Wall And Re Wall Construction Wall Manual Cedar Shake And Shingle Bureau Over Stucco Shingling Cedar Shakes Roof Repair

Pin On Skylite

What Exterior Paint Color Works With A Red Tile Roof Red Tiles Choosing Interior Paint Color Exterior Paint

Top 12 Warning Signs Your Asphalt Shingle Roof Needs To Be Replaced Inch Calculator Asphalt Roof Shingles Roof Shingles Roof Repair
Hurricane Retrofit Guide Membrane Roofs

Floor Framing Connections Raised Floor Living Floor Framing Flooring Connection

Pin On Roof Repair
How To Level A Plywood Or Osb Subfloor Using Asphalt Shingles Construction Felt Leveling Floor Diy Flooring Osb

Cheshire Builders Conservatory Roof Roof Trusses Glass Roof

Easy Shingle Repair Roof Repair Shingling Roof Replacement Cost

Mohawk Cleanprotect Pearl Wood 6 X 24 Porcelain Floor And Wall Tile In 2020 Porcelain Flooring Flooring Floor And Wall Tile

How To Lay Cement Tile In 8 Easy Steps Tiles Cement Tile Floor

Pin On House

How To Install A Subfloor On Joists Ana White In 2020 Installation Squeaky Floors Ana White

The Roof Construction Of A Log Home Can Become A Very Important Design Element Log Cabin Kits Cabin Kits Log Homes

V 11 Rain Diverter A Great Alternative To Gutters Gutters Rain Diverter Rain Gutters

12 Roof Repair Tips Find And Fix A Leaking Roof Roof Repair Leaking Roof Roof

Pitched Roof Insulation Patterned Roofing Felt

Pin On We Cork Flooring

